
Keurig K-Compact K35 Manual⁚ An Overview
This manual provides a comprehensive guide to using your Keurig K-Compact K35 coffee maker. It covers everything from initial setup to brewing and maintenance. Explore the features and enjoy a simple coffee experience. Find all the details you need for optimal use here.
The Keurig K-Compact K35 is designed for those seeking a convenient and space-saving single-serve coffee solution. This compact brewer is perfect for small kitchens, offices, or anyone who enjoys a fresh cup of coffee without the need for a large machine. Its streamlined design doesn’t compromise on functionality, offering a user-friendly experience for brewing your favorite K-Cup pods. The K-Compact K35 is part of the Keurig family, renowned for its ease of use and consistent brewing performance. It’s a great option for individuals and small households, providing a quick and simple way to prepare a variety of beverages. The K-Compact K35 focuses on delivering a quality brewing experience in a small package, making it an ideal addition to any countertop. This model aims to simplify your daily coffee routine. Its design makes it easy to understand and operate, even for first-time users of Keurig machines. With its focus on simplicity, the K-Compact K35 ensures a smooth brewing process from start to finish. Overall, it’s a solid choice for those wanting convenience and efficiency.

Unboxing and Initial Setup
Upon receiving your Keurig K-Compact K35, carefully unpack all components from the box. Ensure that you have the brewer itself, the water reservoir, the drip tray, and any included documentation. Remove all packing materials, including any tape securing the parts. Inspect each component for any damage before proceeding. Place the brewer on a stable, flat surface, away from water sources and heat. Then, locate the water reservoir and remove its lid. Rinse the reservoir thoroughly with clean water to remove any manufacturing residue. After rinsing, reattach the lid to the reservoir. Ensure that the drip tray is correctly positioned at the base of the machine. This will catch any spills or drips during the brewing process. Next, plug the power cord into a grounded electrical outlet. Avoid using extension cords or adapters if possible. Now you are ready to begin the initial setup steps. Always be sure to handle the unit with dry hands and carefully. This will ensure a safe and proper operation. The next steps will guide you through rinsing the system.
Step-by-Step Brewing Guide
To begin your brewing journey with the Keurig K-Compact K35, ensure the machine is powered on and ready. First, lift the handle to open the pod holder assembly. Insert your desired K-Cup pod into the holder, making sure it sits properly. Then, close the handle securely. Place your mug on the drip tray, directly below the dispensing area. Select your desired cup size using the buttons on the top of the brewer. Once selected, press the brew button to start the brewing process. The machine will then proceed with dispensing hot water through the K-Cup, extracting the coffee or beverage. Be patient and allow the brewing cycle to finish completely. Do not attempt to lift the handle or remove the cup before the brewing is finished. Once done, carefully remove your mug from the drip tray, being mindful that it may still be hot. Dispose of the used K-Cup pod properly. Remember to follow these simple steps each time you use your brewer. This will guarantee a satisfying and consistent brewing experience. Cleaning and proper maintenance of the unit will improve long-term use. Enjoy your freshly brewed beverage.
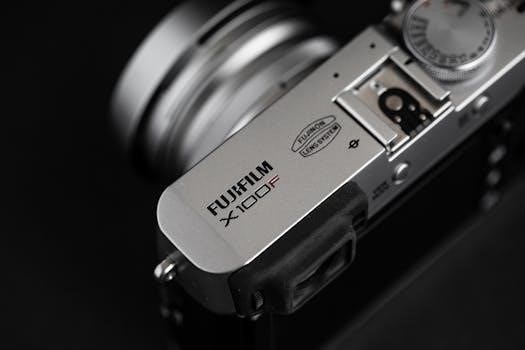
Detailed Guide⁚ Plug and Place
Before you begin enjoying your Keurig K-Compact K35, the initial step involves proper placement and connection to a power source. Start by carefully removing the coffee maker from its packaging, ensuring all packing materials are discarded. Choose a stable, level surface for the placement of your machine. Make sure the location is near a grounded electrical outlet. It’s essential to avoid placing the brewer in areas where it might get wet, such as near a sink. Check that the power cord is free from any obstructions and is not stretched or pinched. Now, take the power cord and plug it firmly into the designated grounded electrical outlet. Verify that the connection is secure. Once plugged in, the K35 is ready to be powered on. Make sure to leave some space around the machine so that the hot steam can be properly released during operation. Do not place it directly under cabinets or shelves. Proper placement and secure connection are crucial for safe and efficient operation. These initial steps set the stage for a smooth brewing experience. This procedure must always be followed to ensure the safe use of the equipment.
Detailed Guide⁚ Rinse and Fill Water Reservoir
The next crucial step in preparing your Keurig K-Compact K35 for its first brew is rinsing and filling the water reservoir. Locate the water reservoir at the back of the unit. First, remove the water reservoir lid. Then, lift the reservoir straight up to detach it from the brewer. Take the empty reservoir to your sink and rinse it thoroughly with clean, fresh water. Avoid using any soaps or detergents for cleaning the reservoir as they may leave residue that could affect the taste of your coffee. After rinsing, fill the water reservoir to the maximum fill line indicator. Use fresh, filtered water for the best possible coffee flavor. Once filled, carefully place the reservoir back onto the brewer, making sure it is securely seated. It is important that the reservoir is properly aligned, otherwise the brewer might not function correctly. After positioning the reservoir, reattach the water reservoir lid. This ensures that the water is properly contained during brewing. Proper rinsing and filling are essential for a seamless brewing operation and ensuring your coffee tastes great. This step also helps keep your machine clean;
Detailed Guide⁚ Powering On the K35
After properly placing and filling the water reservoir, the next step is powering on your Keurig K-Compact K35. Locate the power button, typically found on the top or side of the machine. Press the power button to turn the brewer on. Once activated, the power indicator light will illuminate, signaling that the K35 is now ready for use. The machine may take a moment to warm up as it prepares to brew. During this warm-up phase, you may notice the internal parts of the brewer making slight noises. This is normal behavior and indicates that the machine is going through its initial startup process. It is essential to wait until the warm-up is complete before attempting to brew a beverage. Do not attempt to use the machine until the indicator lights signal that it is ready. The K35 will typically display a solid light or other visual cue, according to the user manual, when it is prepared to brew. This preheating step is critical for ensuring the water reaches the optimal temperature for extracting the full flavor of your coffee. Once ready, you can proceed with inserting a K-Cup pod and selecting your desired brew size. Always refer to the manual for any specific instructions.
Detailed Guide⁚ Inserting a K-Cup Pod
Now that your Keurig K-Compact K35 is powered on and ready, the next step involves inserting a K-Cup pod. Locate the handle on the top of the brewer and lift it to open the pod holder. You’ll see a designated space for placing the K-Cup pod. Carefully take your chosen K-Cup pod and position it inside the holder, ensuring that the pod sits securely in the designated area. Avoid forcing the pod, as it should fit easily. Once correctly positioned, gently close the handle. This action punctures the top of the pod, allowing hot water to flow through and brew your drink. It is crucial to ensure that the handle is fully closed before you start the brewing process to achieve proper extraction. Do not attempt to brew with a partially closed handle, as it will not work. Always check for any obstructions or debris in the pod holder before adding a new K-Cup. This will help maintain the machine and prevent any issues. With the pod securely inserted and the handle fully closed, your K35 is now ready to brew your beverage. You can now select the brew size and initiate the brewing cycle.
Detailed Guide⁚ Brewing Process
With your K-Cup pod correctly inserted and the handle securely closed, you are now ready to begin the brewing process on your Keurig K-Compact K35. Ensure that a mug is placed on the drip tray beneath the pod holder. The K-Compact K35 offers various brew sizes, typically indicated by buttons on the top of the machine. Select your desired brew size. Once you have selected your brew size, press the brew button to initiate the process. The machine will then begin dispensing hot water through the K-Cup pod, extracting the coffee, tea, or other beverage. The brewing process is quick, and the machine will automatically stop when complete. It is important not to lift the handle during the brewing process, as this will interrupt the cycle. After the brewing is finished, the machine will indicate, usually by a light or sound. Wait a few seconds before lifting the handle. Carefully remove your mug and enjoy your freshly brewed drink. The K-Compact K35 is designed to be user-friendly, making the brewing process smooth and straightforward. Always discard the used K-Cup pod after each use.

Maintenance and Care
Proper maintenance is crucial for the longevity of your Keurig K-Compact K35. Regular cleaning and descaling will ensure optimal performance and prevent issues. Follow the instructions carefully to keep your brewer in excellent condition and enjoy great coffee.
Cleaning Instructions for the K-Compact K35
To maintain your Keurig K-Compact K35 and ensure the best-tasting coffee, regular cleaning is essential. Begin by unplugging the brewer and allowing it to cool down completely. Remove the water reservoir, the lid, and the pod holder assembly. Wash these components using warm, soapy water, then rinse thoroughly. Avoid using abrasive cleaners or placing these parts in the dishwasher. To clean the exterior of the brewer, use a damp cloth and gently wipe down all surfaces. Pay special attention to the areas around the pod holder and the spout, where coffee residue may accumulate. For the exit needle, carefully use a paperclip to remove any clogs. It’s crucial to perform these cleaning steps regularly to prevent buildup and to extend the life of your coffee maker. Remember that a clean machine makes the best coffee. Never immerse the main body of the brewer in water, and ensure all parts are completely dry before reassembling. Following these steps will help you keep your K35 in excellent working condition.
Descaling Your Keurig K-Compact K35
Descaling is a vital maintenance procedure for your Keurig K-Compact K35, helping to remove mineral deposits that accumulate over time. These deposits can affect the machine’s performance and the taste of your coffee. To descale your K35, you will need a descaling solution specifically designed for coffee makers, or you can use white vinegar. Begin by emptying the water reservoir and removing the pod holder. Fill the reservoir with your descaling solution or a mixture of equal parts white vinegar and water. Place a large mug on the drip tray and initiate a brew cycle without a K-Cup pod. Repeat this process until the reservoir is empty. Rinse the reservoir thoroughly and fill it with fresh water. Then, perform several brew cycles with fresh water only, to rinse away any remaining descaling solution or vinegar residue. This ensures that no aftertaste remains. Regular descaling, about every three to six months, depending on water hardness, will keep your Keurig running smoothly and your coffee tasting great. Neglecting this process can lead to clogs and reduced performance.

Troubleshooting Common Issues
Encountering issues with your Keurig K-Compact K35 can be frustrating, but many common problems have simple solutions. If the brewer isn’t powering on, ensure it’s plugged into a functioning outlet and check the power cord for any damage. If the machine brews slowly or not at all, it may be due to mineral buildup, and descaling is necessary. Make sure the water reservoir is properly filled and securely placed. A clogged exit needle can also cause brewing issues, so inspect and clean it if needed. If your K-Cup pod is not punctured, check that the pod holder assembly is correctly installed. If you see the ‘Add Water’ light, add water to the reservoir. If your coffee isn’t hot enough, ensure the machine is preheated before brewing. If you notice leaks, check the water reservoir and ensure all components are properly sealed. For persistent issues, consult the official Keurig website or contact customer support for more detailed assistance. Often, a quick check of these elements can resolve a problem with your K-Compact K35.